
 |
| I found this gem at the thrift store for only .25 cents. |
Hello ladies and gents
the other day, while thrift shopping, I stumbled onto a very old vintage makeup kit.
For scrap change, I purchased it and have thought about doing something with it--
but what never really crossed my mind.
but what never really crossed my mind.
I wanted to perhaps showcase it, but even that wouldn't seem enough to me.
Until it hit me, like a ton of bricks--I could recreate the makeup tutorial and showcase it that way.
I didn't use the actual makeup inside the kit, only because it's pretty old and I don't really know what's inside the products but I did happen to have all the right similar shades to recreate the tutorial.
And, as a bonus, these paints I am using are actual grease paints I was planning to toss out because I didn't need them anymore. I purchase a walmart Halloween kit for the sake of a few items that were included last year but never used the cheapy grease paint included. The paints, to my surprise, were the identical ones used in this specific kit. Just slightly altered, for the modern witch! lol
So, taking all my colors and very similar tools...
Like a sponge applicator and things of this nature.
I got to painting!!!!
I put myself into the mindset of an adolescent me and recreated it in a way I perhaps would have if I was maybe 13 or 14 and using this specific kit.
Following the step-by-step guide,
I came up with this rather interesting and oh-so-greasy makeup look.
I do hope you enjoy~!
I can't stress how great recreating this look was.
These kits were my life growing up.
My parents would always buy me and my brother the vampire kit with the plastic cross charm and vampire fangs.
I really got in touch with my younger self when I was painting my face with the grease paints.
I felt like I was 14 and thinking I knew everything about makeup because a kit told me so! hahaa
And now, ladies and gents,
meet Steller--The Teenage Witch~!
And that, my friends, is all I have to show you for today!
Why do a simple little showcase,
when I can actually try to recreate the makeup look it was supposed to be designed for!
HAPPY HALLOWEEN!!!
xoxo

I came up with this rather interesting and oh-so-greasy makeup look.
I do hope you enjoy~!
 |
| The instructions were easy to follow--so, I thought this would be a great opportunity to follow it step-by-step. Not doing anything other than what the instructions told me to do. So, No blending. No special brushes. No nothing!! Just using what the kit includes--or what I can replicate in comparison. |
 |
| Since the kit uses nothing but primary colors that can be found just about in every single halloween themed kit nowadays, I followed the steps. Starting with the "thin layer of yellow makeup as a base" |
 |
| Next step--contouring and shadowing the parts indicated on the diagram with a very green shade. lol |
 |
| Now using black grease paint, create brows and liner. I followed exactly what the kit showed me, and ended up looking like this. lol |
 |
| When your face starts feeling like you have Betty Crocker cake mix spread all over it-- use the red grease paint on your lips. Nothing says sticky, chalky and a mess quite like drawing right on top of your greasy lips using the red Halloween paint makeup. >.> |
 |
| And since the lady on the cover put the black grease paint all over her teeth, I did so as well. It didn't call for it but I wanted to copy the cover perfectly! lol |
 |
| I did take the accessories out, though. Using a box cutter, I gently sliced a side open to pull these guys out. |
 |
| Clip on earring only on one side of your ears. Noice! |
 |
| And only 2 fake plastic fingernails that are much too tiny to the point they literally cut off my circulation! I did, however, own a 90s witch finger from when I was a kid--so, I included that, as well. With the rest of my bare nails, I just used that black grease paint. Why not? (sorry for horrid nails--it was trimming season! lol) |
These kits were my life growing up.
My parents would always buy me and my brother the vampire kit with the plastic cross charm and vampire fangs.
I really got in touch with my younger self when I was painting my face with the grease paints.
I felt like I was 14 and thinking I knew everything about makeup because a kit told me so! hahaa
 |
| Me and my little brother. My brother was a cowboy, and I was a crossbreed between a vampire and a witch. I never could make up my mind. hahaa |
And now, ladies and gents,
meet Steller--The Teenage Witch~!
 |
| I tried to find my old Witch hat but forgot I had it in storage, so I had to make due with the hat I bought my dog this year. lol Also, I happened to have this old little plastic pumpkin pail my brother got me a year back on hand. Perfect for this look, I'd say! |
 |
| I tossed on what I'd probably wear if this was my costume as a kid--a cape to cover my whole body and a black satin skirt to wrap around me and pin to the nape of my neck because I also grew up pretty poor and had to create my own costumes every year. hahaa |
 |
| Clip on earrings really bring back some memories! Sheesh! |
 |
| Goodness, I really am thrilled that this whole thing came out as chalky as it did. I'd probably be angry if it came out too polished, not gonna lie. My young self didn't know ANYTHING about blending or brushes-- so, the chalkier...the better! |
 |
| Just a 28 year old woman playing around in some Halloween makeup! Nothing to see here. lol |
 |
| Goodness, i remember these little black fake nails. I used to hate them yet love them at the same time. Hate them because they would constantly pop off...but love them because...nails! lol |
 |
| If you got it--HAUNT it~ |
 |
| Looking something fierce with those high-to-the-sky thick brow boys! |
 |
| I actually like the way my lips look in this paint. Goodness, that's a beautifully plump pout! |
 |
| Not judge me, I still own my fake witch finger. It suits me well, okay?! lol |
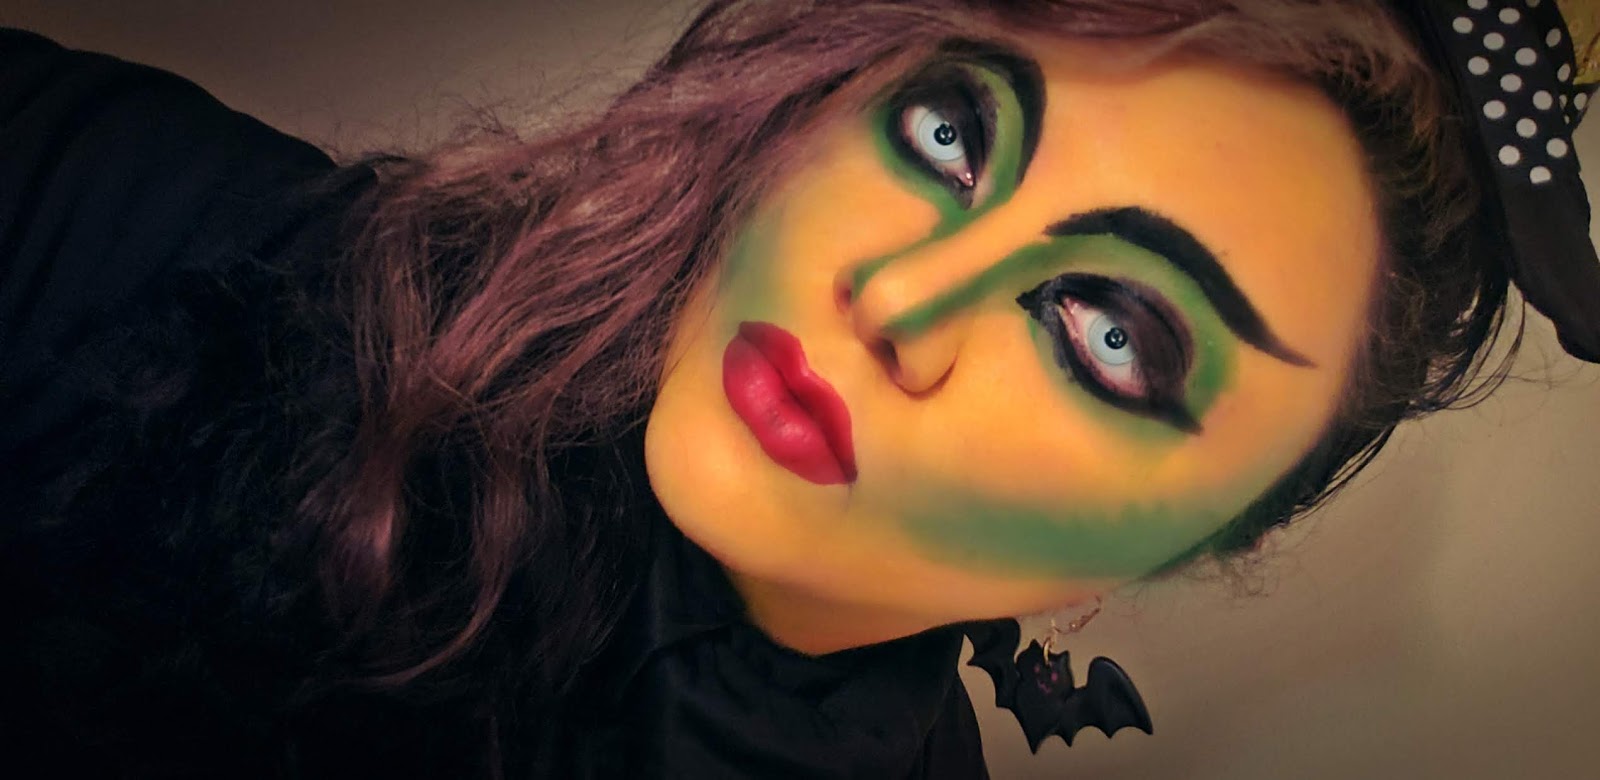 |
| I am digging the Cyndi Lauper Earring and very retro, very 80s/90s color contrast with the makeup. I understand a green witch, but yellow? With green contour? Red Lips??? It's so odd, yet so beautiful! |
And that, my friends, is all I have to show you for today!
Why do a simple little showcase,
when I can actually try to recreate the makeup look it was supposed to be designed for!
HAPPY HALLOWEEN!!!
xoxo

No comments:
Post a Comment